In this tutorial, we will learn how to colorize Linux Terminal in order to make it exciting and fun. In addition, we will also set-up command auto-suggestion, command completion, syntax-highlighting, and other useful stuff. Although this tutorial is primarily for Linux users, users of Termux, Windows Subsystem for Linux, Cygwin, MacOS, or other Unix-like Operating Systems can also follow this guide but some steps may be a little different for those users.
Goal
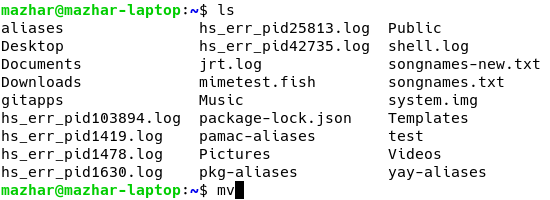
We want to change our Terminal from this
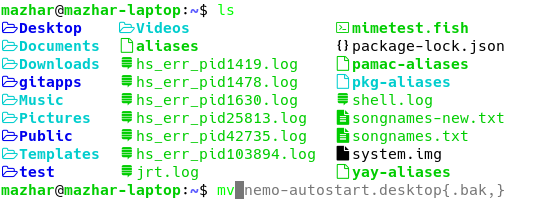
to this
Choose a Terminal App
First, we need to choose a good terminal app. Some of the good terminal apps are:
Windows 10&11: Windows Terminal Android: Termux (installed from F-Droid not Play Store) Linux (with KDE): Konsole Linux (with Gnome): Gnome Terminal
Change Terminal Shell
Now, we need to change our terminal shell.
What is a terminal shell?
A terminal shell is a program that is responsible for all the text you see printed out in your terminal app including the commands you type. It receives what you type in the terminal and executes it for you.
Some Modern Terminal Shells
Some of the modern terminal shells are:
- Zsh (supports syntax-highlighting, command auto-suggestions, etc.)
- Fish (syntax-highlighting, command auto-suggestions, etc. are enabled by default)
- NuShell (output of built-in commands is in tables which are easy to understand)
Changing the terminal shell
We are going to change our shell to fish because that is the easiest to configure.
1. Install the fish shell
Installation process will be different on different systems. The commands to install fish for some systems are given below
MacOS (with homebrew installed):
brew install fish
Debian/Ubuntu and derivatives:
sudo apt install fish
Arch Linux/Manjaro and derivatives:
sudo pacman -S fish
RedHat/Fedora/CentOS and derivatives:
sudo dnf install fish
Termux:
pkg install fish
2. Change Shell to Fish
There are two methods for this;
Note: Changes take effect on new Terminal Windows. This means: after performing one of these methods, close the terminal and re-open it to see the changes.
-
‘chsh’ Method
I don’t recommend this method except only for Termux users. They can use this method without any worries.
-
Run the command
which fishto get file-path of fish shell -
If you are NOT using Termux, run the command
chsh -s /path/to/fishto change your shell to fish. But if you ARE using Termux, then run the commandchsh -s fishNote: Replace/path/to/fishwith the actual path to fish shell
Note: If step 2 doesn’t work, then run the command
echo /path/to/fish | sudo tee -a /etc/shellsand repeat step 2. It should work now. -
-
‘Custom Command’ Method
This method only works in the terminal app for which you use this method. Steps for this method are:
- Open your favorite Terminal App
- Go to Settings of the Terminal App
- Find a setting named ‘Custom Command’
- In the text field of ‘Custom Command’ type ‘fish’ without apostrophes/single-quotes
- Save Settings
3. Personalize Fish Shell
-
Make sure you have at-least one web browser installed
-
Make sure you are in fish shell
-
Run the command
fish_configNote: It will open a local web-page file in your preferred web-browser where you can change settings of fish shell using a Graphical Interface.
4. Disable Welcome Note
Each time you open Terminal, fish presents a welcome note. To disable that, run the command set -U fish_greeting in terminal
5. Get Bash-like Prompt in Fish
You may have noticed that the prompt shown in above picture is not available in fish settings. That’s because it is a custom prompt that I made. It is inspired by Bash Prompt found in Debian/Ubuntu systems but has much more features than its Bash counterpart. To get that prompt, First make sure wget is installed on your system, then run the following commands in terminal.
wget https://github.com/realmazharhussain/easier-linux/raw/main/fish/prompts/mazharhussain.fish
sudo mkdir -p /usr/share/fish/tools/web_config/sample_prompts/
sudo mv mazharhussain.fish /usr/share/fish/tools/web_config/sample_prompts/
Now, that prompt will be available in Fish Settings as mazharhussain and you will be able to set it as your Fish Prompt.
Enable color for commands
Some commands like ls, grep, etc. support color output. It may or may not be enabled by default on your system.
To enable color for such commands, follow these steps
-
Create a file named ‘aliases’ in your home folder with the following contents
alias ls='ls --color=auto' alias dir='dir --color=auto' alias vdir='vdir --color=auto' alias grep='grep --color=auto' alias fgrep='fgrep --color=auto' alias egrep='egrep --color=auto' -
Edit configuration file for your shell to include this file. For fish, edit either the file
$HOME/.config/fish/config.fishor/etc/fish/config.fishand add the following code at the endif status is-interactive if [ -r ~/aliases ] source ~/aliases end end
Use Colorful Alternatives to Colorless Commands
exa (alternative to ls)
exa is a modern alternative to ls. It is colorful by default and it supports advanced functionality e.g. icons, showing directories(folders) first then files, etc.
By default, exa does not show icons and works pretty much like ls with --color=auto option. To use its unique features you need to provide options to the exa command. For example, running the command exa --icons will run exa with icons enabled. I use exa by creating some aliases to it with all my options enabled. I add the following lines to my $HOME/aliases file
alias  l='exa --icons --group-directories-first --all --grid'
alias la='exa --icons --group-directories-first --grid'
alias ll='exa --icons --group-directories-first --all --long'
In this way, I can use the commands
lto list files, directories (including hidden files)lato list files, directories (excluding hidden files)llto list files, directories in long-list format (including hidden files)
In all three of the above commands, icons are shown and folders are listed first.
Note:
To use this command properly with icons, install some nerd fonts e.g. ‘MesloLGS Nerd Font’, ‘Source Code Pro Nerd Font’, etc.